Wednesday, September 11, 2013

Mr Regel's Maths Tie

This project was completed in a single lesson with the idea that our maths teacher could wear it while invigilating our maths exam, next week.
We simply used a red polyester tie with navy blue paint and fabric medium to create a basic pattern of 4 mathematic symbols. We measured the tie against another teacher so we knew where to print it from. Mr Regel was really impressed with our creativity, but said he would only ever wear it on the one occasion as there was really nothing in his wardrobe that it matched.

I'm Finished!

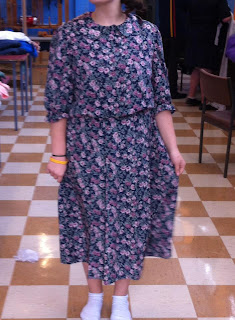
After weeks of sewing and unpicking, I have finally finished my project.

This project was a lot more difficult than I expected it to be, however it was a great learning experience.

The part I found most challenging was taking the dress up. Instead of hemming I unpicked the top and bottom apart at the waist, then cut the top off the bottom piece. I thought to myself this is easy, boy was I wrong. All i had to do was sew the top to the bottom piece, easy enough? Once i finished the pinning, it was time to sew. It wasn't till I had completed sewing that I found out I had sewn the wrong sides together. After resewing, I thought i had finished, I was wrong. The back pleates were hanging over the waist seam, yes I had to unpick once again.

Luckily my teacher took my dress home to finish for me. 
THANK YOU MRS WALKER!


Wednesday, September 4, 2013

Spaghetti Straps to Halter COMPLETE!

 
Dress is done No more spaghetti straps a nice suppportive halter! Perfect to wear out to my 16th Birthday Dinner!

Spaghetti Straps to Halter!


I was searching through some box's of clothes from an op shop and came across this stunning dress that can be made even better! I tried it on and it fit perfect!
I really dont like the spaghetti straps that cross over, they're so confusing and tacky, so I've cut them off, and I'll be creating a halter neck.

Playsuit the Jumpsuit COMPLETE


 This is a photo of my Garment all hemed up and put into shape,
I hemed the legs up to a better length the shorter style, and took up the sleeves into more of a racer like top half.
This is the done and dusted Playsuit, with a lace like Doiley collar and belt, all ready to be worn out this summer!

Tuesday, August 20, 2013

Amelia's Lace Skirt

After finishing my jumper project and seeing that a lot of other people were working with lace, I decided to give it a go myself. Another girl in the class brought in a couple of her ma's lace table cloths and I thought I'd see what I could do with them.
I found a skirt at home that I'd bought at the start of the year, that had been a little bit short for my liking so I brought it in to see what I could do.

I started by cutting the centre out of the table cloth, leaving only the border, i then cut one of the corners so that it could be turned into a linear piece of material. I then took my skirt and pinned the lace upside down around the bottom hem- this allowed for a seamless look when I finished sewing.

After sewing the lace to the hem, I hand stitched (terribly) the ends of the lace together and voila! I was done in just two lessons. Now, rather than a scantily short cotton skirt I have a knee length, maroon and white, cotton and lace skirt- perfect to wear out, without having to worry about constantly pulling it back down at the back.

-Amelia

Lace dress


In my original design I was going to make a whole new three quarter length top to go undreneath the dress. To save time I decided to change the idea and turn the back into lace and put a small bit in the front.

Wednesday, August 7, 2013

Reverse Applique


Along the way in our recycling journey we will be learning some techniques to improve our up-cycling skills. For our first technique some of us have been exploring the process of reverse applique. 

Here we take two panels from different coloured t-shirts, create a design on the top panel then cut it out. The second panel is then layered underneath and hand sewn together with small visible stitches.

The final product is a lovely soft and flexible panel that can be turned into or incorporated into another garment.

Pretty cool huh :)

Tuesday, August 6, 2013

Plain to Fancy


My plan is to turn this plain dress into something more fancy that I can wear for special occasions.


I'm getting a lace material to attach to the top of the dress and waist band to spice things up a little.


Wednesday, July 31, 2013

 
A.P.

For my first project in YOUNG DESIGNERS I will be transforming this sweater into a vest.

I'm really not sure if this will be a nice vest but the sleeves have holes in them and therefore are unusable.

I will start by removing the sleeves and turtleneck (because no one will ever look good in a turtleneck vest) and using a part of the sleeve as a pocket to cover up a stain on the left side of the chest that looks like there used to be a logo there.


Amelia+ Grandpa Sweaters= LOVE

Today we were all called into the textiles room and it was like St Peter had let me in the Pearly Gates into Grandpa-Sweater-Heaven! I am a life long fan of the Grandpa Sweater and I immediately adopted one for my project (and the sweater shown below, for my personal use)
 
I got the inspiration for my project from a picture I saw on Pinterest. My idea is to use the sleeves of the sweater and another fabric to make a long sleeved shirt with a flowing bodice. The sweater I've chosen for my project is below:


I have a few options for my other fabric but I'm not entirely sure which one I'll use.

Playsuit the Jumpsuit

Up Styling.


 My plan is to change this piece of junk into something
I can wear this summer.


I plan to get rid of these terrible sleeves and make it into a racer shape.
I'm taking up the legs for the mini shorts to be more "2013" and not "1950"
I also want to add a lace like collar, change the colour of the buttons
and add a belt hopefully out of the same material as the collar!


Tuesday, July 30, 2013

The Up-Cycling Has Begun

I was inspired by the picture below which I found on Pinterest.


I have selected a dress to create something similar to the picture above. 
My goal is to create two dresses that I'm comfortable wearing in public. To achieve this goal hemming, sewing and cutting is required.


Friday, July 26, 2013

The Stage is Set


Thursday, July 25, 2013

Fashion Parade

Last term the young designers held a fashion parade. They created new outfits out of recycled clothing from the local lifeline store. Over a few weeks they planned a fashion parade and asked some students from the school to model the outfits for them. A catwalk was decorated and a band Dudley and Cho from Big hART performed some music for the show. 


I was one of the models selected for the event. Each model was given a different clothing look to wear, mine was street wear. I wore a caramel ribbed jumper, a denim vest, black ripped jeans, and a cream scarf. We lined up behind the stage and when it was our turn to go we were escorted down the catwalk by Isaac. As a thankyou each model was given a flower.

Wednesday, July 24, 2013

Launching Lunch


It began with an idea to showcase an up and coming artist residency to the students in which they could be involved with.

After securing the sum of $50 we secured, from a very generous local thrift shop manager, four bags of textiles. Those garments and accessories where to be curated into a fashion parade using only the thrifted articles.

A couple of students got together and layered and arranged the garments until an amazing amount of outfits were formed. The collection had a modern hipster feel about it and it was hard not to be incredibly impressed by the outcomes considering there was no sewing involved. A big thankyou to Kiarah and Teleah for all their hard work and to the models who were so great in their performance.

With the vision of the parade geared to creating a unique Tasmanian look the students sewed some lace bunting cut from a curtain to decorate the cat walk and a quick tablecloth transformation made up another garment to be added to the collection (go Teleah!)*

A great local duo, The Dudley Night Shades, were arranged by the lovely Ellen to perform for us on the day.

Now imagine this at your local high school: It's lunch time, the sun is shining and is warm on this beautiful winters day. A runway is set up in your local quadrangle decorated with pillars - bunting and hessian, objects made by the MDT class are set up on display. A band rocks out some great songs, you eat pizza arranged by the SEC, you watch an exciting fashion parade organised by your besties, then finish off with some more great tunes before you head back to your class.

This actually happened and it was amazing. It was a fantastic experience and something everyone involved in should be proud of.

*NB The table cloth top refashion was quickly gobbled up by one of the band members and she plans to add it to her already awesome wardrobe.


And so it begins...


Who? 
The Young Designers are a group of students from Wynyard High and one artist in resident Michelle Walker.

Where?
Located in Regional North West Tasmania.

Why?
An artist in residencey grant allows this unique project in which students will source second hand textiles and recycle - upcyle and transform the article in to something new exciting and once again worthwhile. 

What?
Outcomes may include but not limited to: Fashion parades, competitions, marketing, branding, market stalls, business experience, IT skills, design skills, sewing, printing, dying, and weaving.

We would love for you to experience this very exciting project with us along the way and  therefore we will be blogging here the designs as they happen.

Please feel free to comment and interact with the project. We would love hearing from you.
 

Designed by 100 Web Hosting